19.5.12

Stone Masonry!

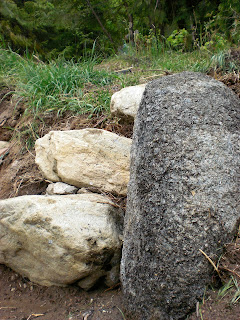
little bench for observing, and tea drinking :)
It's been a wild WILD few weeks here. A great neighbour borrowed us his bobcat, which is such an extraordinary gift that we stopped everything else to take full advantage.

The first task was to dig an irrigation trench. By the end of that dig, the garden looked more like Viet Nam in the early 70's. Rock work and earth work have really kept me from the will to blog at night, as there have been a few deliriously hot days here on the hillside. I MUST get on the 'before-picture-bandwagon,' as the after pictures are quite thrilling in the comparison.

I was putting down some black bags to keep the (ever immortal) Kooch Grass at bay, and, in pinning it down with some rocks, built a little bench.

central staircase
Weeding was on the agenda, but the big rocks seemed to just want to go into place instead ;)
D, myself, and D's dad (also D... D2?) started up on some staircases, which really got the creative juices flowing.

Next we needed better wheelbarrow access to the upper gardens we created. See this blog for the story of creating that(!) So much work is getting done here. Many things have lost the obstruction from the winter snow-over. I happened to be reading on "Obstruction" in the I Ching a few weeks ago (I keep an I Ching blog, too) and the way through it was to have "subordinates" play their position. I've found I have lots of creative energy for this kind of work: The decisions, though, at this time, are for D&S to make.

We've built a new chicken coop, a second yurt, tidied the garden shed, tilled for new fields, and now we're into landscaping. We're looking forward to getting the shop spaces in order so that the house-building can begin next summer.

wheelbarrow ramp: wish I had the before picture!
left side of ramp
side view

top view: a steeper, slower staircase
this rock wasn't nearly as heavy as some of the others

right side of the ramp
close up - more work/fun! waiting up hill :)

I just been loving the character and colour of the stones as they wash up!

While we were digging out the hole for the stairs, we came across some old old chicken wire. It was at least three feet under the ground. I was totally amazed how the earth and trees were reclaiming this!


The old hillside has clearly had many generations of effort take place here. It is wonderful to be bringing my friends forward into their permaculture dream. It is also great to be learning of permaculture, hands-on: it is simply so congruent with all other matters in my life. I've been calling it "organizing common sense."

3.5.12

Yurt Near Completion

Catching up on some blogging here, I'm posting the pics of the other week's work. In eight days, we built the structural components of this yurt, washed the coverings, and invented, built and dug the footings... We're all feeling very proud of the achievements so far, and the summer is only just beginning!!

Enjoy!


sawing 1x4 to the right length

drilling holes in 1x4
lining of the holes for the bolts

great bolt shot, with rough hewn cedar

getting the lattice wall upright and into place was
a bit of a puzzle and struggle

"... Back in Nam..."

almost there...

closer.. closer...

The Little Yurt That Could.

Getting the roof up

Chainsaw Art

Many versions of this ring were tried,
including an old car tire rim!
But this balanced the best.

Great view for Perma-campers!
Awesome times, gettin' er done.
Ta-freakin'-Da people!
8 Day Yurt!

Lots of room for an exceptional deck... later.


Still having some ambition to burn,
I dragged a giant stump fifteen meters to the fire I started with
a gasoline soaked blanket. Yup. Burning slash & crap wood.
Getting the coverings in place.
So it's no palace yet, to be certain. The coverings are hanging to dry here
 after we washed them. The 'Murt,' (Men's Yurt) will soon be decked
with Foos-ball and death metal posters.

Recycling

Brutal nasty van, with all kinds of crap inside.

A remarkably decrepit van needed to be hauled away from the property. Who knows exactly how long it was there. I took the opportunity to catch a few clips of the undaunted moss growing on the sides :)

Enjoy!

This is the favorite shot!


Gasoline poured out as the tow truck
lurched it about on the mountainside.
We captured it with a bucket and blanket.

Sunshine and moss eating metal...


19.4.12

Yurt Construction - Part III - "Cheap Labour"

Permaculture is a great way to exchange skill, time, expertise, and friendship. The deck is in place now, and pretty much level! There is a slight slant, but it goes toward the downhill, which is actually an advantage, should any moisture actually get inside some day. It is great to see things come together so quickly.


My new sunhat also works great in the rain. It doesn't do so well for carrying plywood, but it is great when one is hot, as the shape creates a funnel for the heat. It is like working with a gentle breeze throughout the day.


The Little Yurt That Could..
curious pups


adding bracing
starting the deck with a 4'x4' hole
for a 20' deck
a good days work
beautiful geometry, for building on the fly


17.4.12

Yurt Construction - Part II - FOAM HENGE


The concrete pilings unfortunately did not work out well for us. I think we needed more concrete mix in general, as when we 'rolled' them... they crumbled instead. Some of them are alright still, and we'll perhaps use them to weight down/tie down the frame from underneath.

Instead, we made our own "Foam-Henge." ... Which quickly lead to "ET, foam home..."  Little styro obelisks for monkeys smaller than ourselves to both worship and fear. A quick 'sani-wrap' and we had instant pilings - again using junk/salvage material - and these ones will have zero chance of rotting.

D secured literally hundreds - if not a few thousand - of these foam blocks from a nearby tree nursery. They are otherwise being shipped back to China to be reused there... for stuff. The nursery is grateful for anyone who wants to come grab them, saving them on shipping.

Levelling them up was fun.

And we finished a good chunk of the decking frame. Tomorrow we'll most likely get the deck complete.

We put the plywood on top, so that we can toe-nail into them once the deck frame is built.
small footprint made: remove duff, and dig into clay


the level-er


centre framing


octagonal frame, 90' facings @ 22.5 degree cuts

not too bad a level, considering the hillside, and that its not tacked down yet.